New Orleans House Project

Showing posts with label Gathered Harvest. Show all posts

Monday, January 9, 2023

As the Needle Sews

 Hi quilting friends!

I thought my quilt blogging days might be over as I lost my blogging mojo somewhere during the second half of 2022.  I decided to take a break from blogging and see if I was well and truly finished with the medium.  It's only been in the last few days I've thought about giving the blog a visit.

I don't know how my blogging efforts will carry out in 2023, but I'm going to make a start and see what happens.

Even though I lost my blogging mojo, I didn't lose any quilting mojo!  Here are a few finished projects from 2022.


I finished this mini quilt in June, 2022 with plans to share it for Wendy's  (The Constant Quilter) monthly mini challenge.  I never got around to posting it, as I got called away to help my mom move to an independent living facility.  The selvedge basket blocks were made in 2016 for a blog hop celebrating Diane Knott's first book, Scrap Quilt Secrets.  It doesn't show up in the pictures, but I hand quilted some flowers inside the basket handle, then machine quilted the basket outline.  Now I have the perfect Easter wall hanging!
 

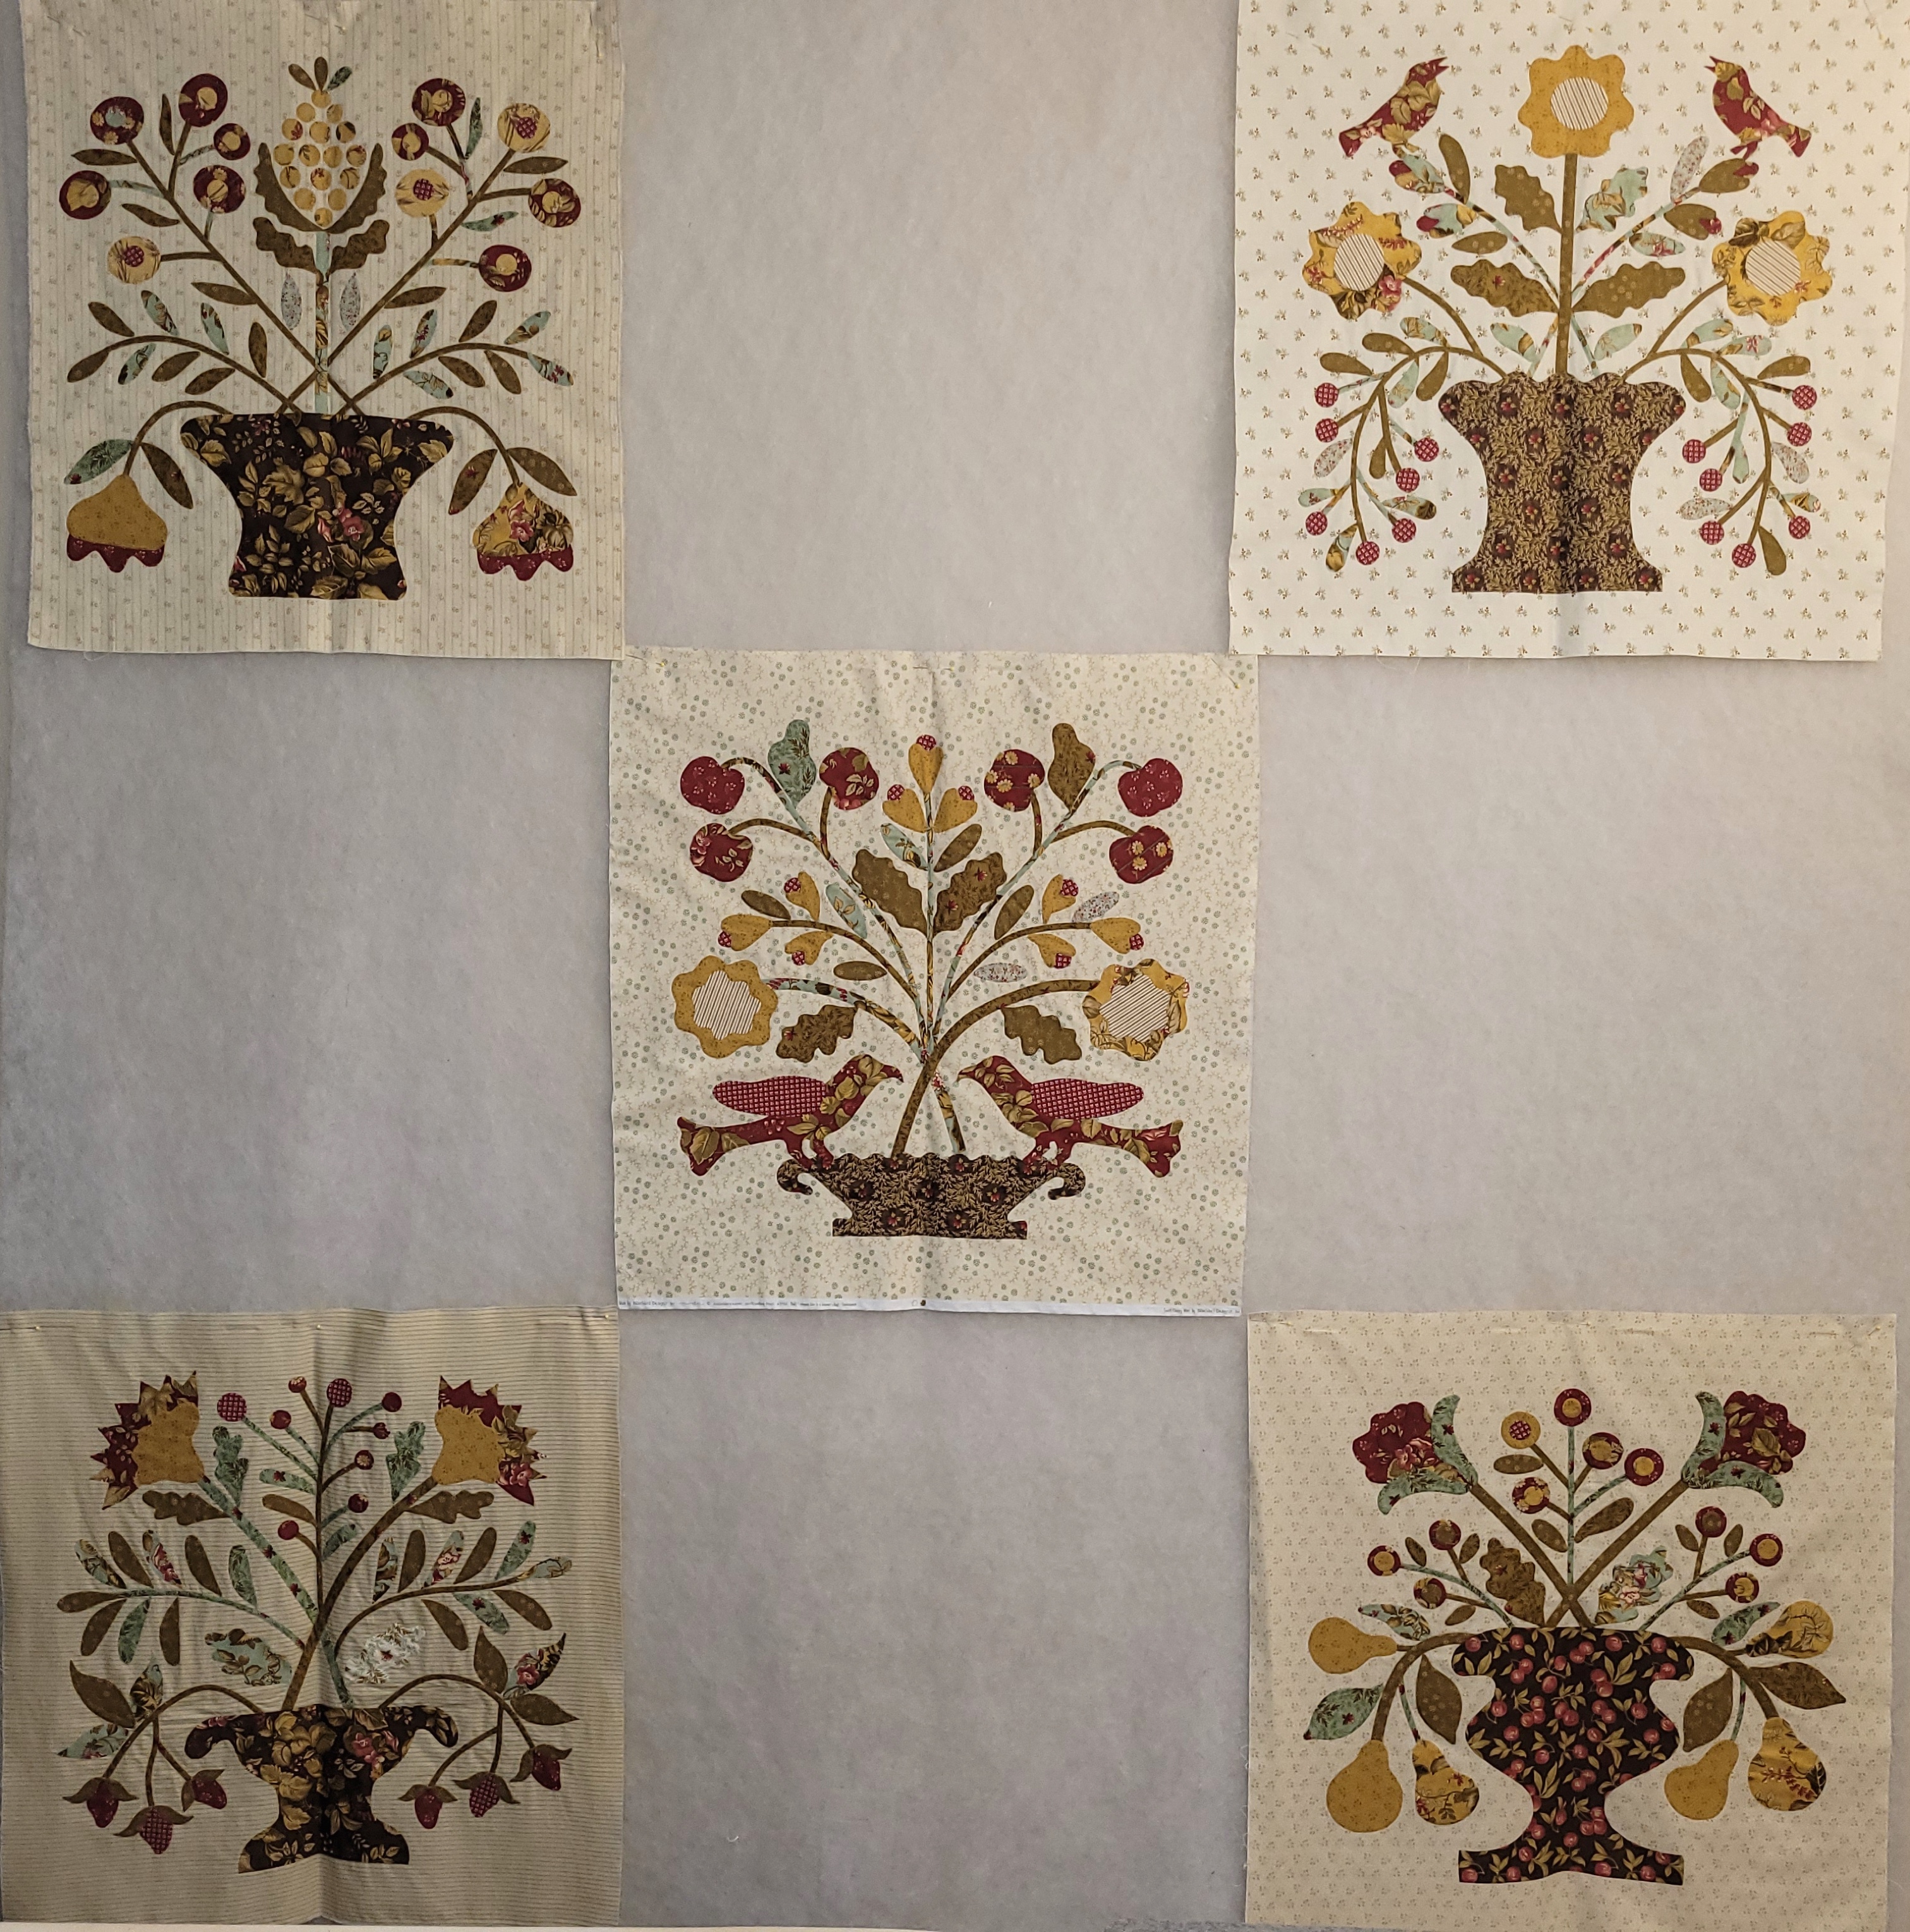
Yay!  I finally finished Blackbird Designs' Gathered Harvest quilt!  Well, it's still waiting for binding, sleeve, and label, but I should have that finished by the end of January.


Undercover in Chicago V - a mystery quilt by Debbie Caffrey.  My local quilt guild does a mystery quilt every year.  As a new member, this was my first year to participate.  The goal is to finish the quilt and share it at our annual Christmas meeting in December.  I'm happy to say I met the goal!  I still need to add a label, so I'll share more pictures when that's done.

Bonnie Hunter's Carolina Chain.  The blocks were made as a Rainbow Scrap Challenge project and finally assembled late last summer.  The finished quilt has already been gifted (and I forgot to take more pictures!).

Another Rainbow Scrap Challenge project - Burgoyne Surrounded - which got started in 2017.  The picture only shows the block arrangement prior to assembly, but they got assembled and are awaiting their turn to be quilted.


 Mardi Gras Memories, pattern by Diane Knott.  My regional quilt guild - Gulf States Quilting Association - will be holding their quarterly meeting this month in New Orleans.  My local guild (Cotton Pickin' Quilters 😁) is co-hosting the meeting, and our theme is Mardi Gras (Mardi Gras will be celebrated February 21 this year).  The call went out for Mardi Gras-themed quilts to decorate the meeting venue, so of course I had to contribute.  Fortunately, I had started the quilt much earlier in the year, so it wasn't a huge hurdle to finish. 

OK, that's enough for now!  I still have some holiday projects to talk about, and then there's that pesky planning for 2023 quilts.  Maybe the blogging mojo is returning?


Friday, May 20, 2022

Gathered Harvest(s)

 As I discussed last week, I have been sticking with my plan of devotion to UFOs.

The hand quilting is going slowly, mostly because I'm reluctant to stitch more than 20 - 30  minutes at a stretch.  Longer stitching times lead to hand and wrist discomfort - as in carpal tunnel symptoms.  One eagle is almost completely quilted, so that's something! 

I finished machine appliquĆ©ing the first vine block of four needed finish the Gathered Harvest BOM.  The block still needs a good soak, then blocking and trimming.


I immediately started the prep work for the next block.  

I have a system worked out for prepping the appliquĆ© pieces.  I lower my ironing board so I can sit while I'm working, and cover the surface with a large piece of cotton canvas fabric.  The fabric soaks up excess starch, and protects the ironing board cover from scorching.  I can just move the fabric around when I need a "clean" work area.

Before sitting down at the ironing board, I've already traced, cut and pressed the freezer paper appliquĆ© patterns/shapes to the wrong side of the different fabrics being used.  I use my trusty Karen Kaye Buckley 4 inch Perfect Fabric Scissors to trim around the appliquĆ© shapes, leaving just the right amount of seam allowance.

I mix my own starch solution using liquid starch and water.  I have no favorite starch brand, I just use whatever I can get at the local grocery store.  I mix the starch solution in the black sprayer bottle,  then spray small amounts of it in the little plastic medicine cup.  Using a very small paintbrush, I brush the starch solution around the seam allowance of the appliquĆ© piece.

Once the appliquĆ© piece has been starched, and while the starch is still wet, I use the cuticle stick and the Clover Mini Iron to press the seam allowance to the wrong side of the appliquĆ© piece.  The starch helps hold the seam allowance in place after the freezer paper has been removed.

After working diligently yesterday, I've got most of the pieces prepped for the next block - even the circles!

To help keep me motivated, I cleared off the design wall and pinned up the completed appliquĆ© blocks.  The pattern is Gathered Harvest from the book Fresh Picked by Barb Adams and Alma Allen, aka Blackbird Designs.


In other gathered harvest news, we are already in the throes of summer here, with daytime temps in the upper 80s and low 90s.  Very little rain, so we've been watering our container gardens faithfully.  


The peppers seem happy with the weather, as they've been producing like crazy!  This is just a 2 - 3 day harvest of banana and jalapeno peppers.  I sliced them all up and pickled them; wound up with 3 pints of each type of pepper.  I wish the tomatoes would come in so I could make some salsa!


Thursday, May 12, 2022

Devoted to UFOs

 Two UFOs have been clamoring for attention (again).

I have blogged several times about my good intentions to finish up these quilts, but somehow life and other quilt projects (dare I say Squirrels?!) seem to get in the way.

I've come to the conclusion that it's time to focus on these two projects exclusively from now until they are finished. 

I started the 4-block eagle quilt in 2015.  It was my first major hand appliquĆ© project.  I finished the appliquĆ© fairly quickly, but I procrastinated on starting the hand quilting until last year.  

The background quilting is complete, so now I need to quilt all four eagles, as well as the HSTs in the quilt border.  If I quilt a little bit every day, I'll get it done in no time, right?


The other unfinished project demanding attention is Gathered Harvest - a BOM I started in January, 2018.  

The quilt is made up of nine blocks, five of which are complete.  Now I need to make four of these flowery vine blocks - identical except for different fabric placements.  Yes, each block has twenty appliquĆ©d berries/circles!

Since snapping the above picture this morning, I've finished prepping all the leaves, berries and bias strips.  I'm using the freezer paper and starch method to prep the appliquĆ© shapes.  

Next up, a little fabric glue and lots of machine appliquĆ©.  

If it weren't for those pesky oak leaves, I could probably knock out the four blocks pretty quickly.  Those oak leaves take a little more concentration than your typical appliquĆ© leaves, although I'm getting quicker at prepping them.  By the time I finish all the blocks, I'll probably be able to do them with my eyes closed!


Sunday, August 15, 2021

August for AppliquƩ?

 When I went to Florida last month, I took along an appliquĆ© project that was long-neglected.

I started making the blocks for Blackbird Designs' Gathered Harvest quilt in January of 2018.  The project was a BOM from my local quilt shop, Quilted Owl (sadly, now closed).
Most of the blocks were machine appliquƩd with invisible thread, but I stitched this one by hand (no sewing machine at my mom's house).

BTW, the project can be found in the book Fresh Picked in case you're looking for a Blackbird Designs project to make in honor of Barb Adams.

With this block complete, I only need to make four Grapevine Wreath blocks.
Grapevine Wreath by Barb Adams

Shouldn't take too long to make four of these blocks, right? 
You'll notice each block has 20 appliquĆ©d circles.  In contemplating the best method for making all those circles, I considered Karen Kaye Buckley's Perfect Circles and the Applipops tool.  I finally decided the best method for me would be to order some 1 inch circle templates from Paper Pieces and prep all the circles at once.

I also ordered an acrylic circle template which includes a 1/4 inch seam allowance (Paper Pieces).  I used it last night to trace and prep a few circles, but found the 1/4 inch seam allowance to be a little generous for the circle size.  I may be better off just using one of the card stock circle templates to trace the circle shape and cut my own (less generous) seam allowance.

Taking a glance at the calendar, I see we're already half-way through August.  If August is for appliquĆ©, I need to get busy!


Sunday, November 25, 2018

Focus on the Finish!

Folks who read my blog blather on a regular basis know I have been trying to stay focused on finishing projects that have been in the WIP and UFO stage for too long.  I got started on this Finish Focus when the commotion made by all the stalled projects overwhelmed me every time I entered my sewing room.  

I've made good progress over the last few months, but when I sat down this week to make a list of projects to focus on for 2019, I found the list was still heavy with UFOs.  At the same time, the list of projects I want to attempt doesn't get any shorter, either.  All I can say is, "So many quilts, so little time!"

One recent project was to finish binding this large (88" x 88") quilt.  I'm happy to report the binding is finished, as is the label.  I haven't had an opportunity to do some really good photos of this quilt; maybe before year's end that will happen.

Autumn decorating season reminded me this candle mat was still unfinished, so I got busy and completed the embroidered details.  Once that was done, I stitched on the backing and pronounced it Finished!  This was a wool project started at a workshop at my LQS, Quilted Owl.  Pattern by Primitive Gatherings.

Another UFO was this knit shawl I started at least 4 years ago - probably longer, but the exact date is lost in the mists of time.  About three-quarters of the way through, I realized I needed more yarn to finish the project.  Although it was easy to obtain more yarn and the colorway matched fine, the texture of the second skein was a little different and the second side of the shawl came out a bit looser than the original.  Or maybe that's because my knitting became looser over all the years it took to complete the shawl?!

Pattern:  Nae Shawl by Anat Rodan.  Yarn:  Fino by Manos del Uruguay.  I finished the final stitches on this last night and popped it over my shoulders as Dear Son and I were binge-watching "The Last Kingdom" on Netflix.  It was the perfect amount of warmth for one of our cool, but not cold, fall evenings!

Another Finish Focus is to complete the binding for several quilts.  This Nine-Patch variation quilt started out as a Rainbow Scrap Challenge project in 2016.  The backing fabric has been in my stash for years and I thought it would make a fun back for this particular quilt.  Having a printed backing seemed to dictate using a solid for the binding, although I like to use bright prints for the bindings on these RSC quilts.  Fortunately, I found the perfect light purple cross-weave fabric in my stash - I love it when that happens!

Diane Knott of Butterfly Threads Quilting did the long-arm quilting for me.  This picture doesn't do it justice, but it's the perfect amount of swirly softness to complement all those squares.  Diane did a fabulous job and I can't wait to take some glamour shots to show off her work!

Still more Finishing:  Fun with Barb's Nine Patch swap blocks (2014).  I had seen this setting years ago in a quilt magazine (remember when we got our inspiration from quilt magazines?), clipped the picture and added it to my quilting bucket list.  Barb's Nine Patch swap was the perfect opportunity to use this setting.  Some sources call it Tonganoxie Nine Patch, but if you Google that, you'll get all kinds of variations.  Yes, the background fabric is supposed to look kinda washed-out and splotchy - it's from a Betsy Chutchian line called Rachel Remembered.  

I'm still debating whether the quilt needs a border/borders.  While I was rummaging shopping in my stash for potential border fabrics, I came across this chunk of Mark Twain-themed fabric that will be perfect for the backing.

One of my focus quilts for 2019 will be Burgoyne Surrounded - another Rainbow Scrap Challenge project that has gotten stalled.  I need 25 BS blocks for the quilt (current count: 15) and 30 nine-patch (3 inch) blocks for the setting.  I pulled scraps from my 1.5 inch strip bin and cut lots of nine-patch parts to use as leader-enders over the next couple of weeks.  Here are a few that got finished as I stitched up the Tonganoxie/Fun with Barb Nine-Patches.

My big focus for the rest of this year is going to be working on the blocks for the Gathered Harvest appliquĆ© quilt.  This was a BOM from the Quilted Owl.  My goal was to perfect my machine appliquĆ© skills on this project.  All the pieces are ready to be stitched for this block, so I just need some un-interrupted machine stitching time.

Sorry for the long re-cap!  It looks like I've accomplished a lot over the past few weeks, but honestly, most of these projects just needed a few hours of attention to get them Finished.  It makes me happy to see the progress, and the noise from UFOs has abated somewhat.  I think it's almost time to reward myself with a new project!


Sunday, June 10, 2018

Checking In With a Few Finishes

Wow!  Where did the second half of May and the first week of June get to?  

I have been working on quilting projects, but feeling very haphazard in my use of time.  Sometimes it's hard to stay focused when your sewing time only comes in short spurts.   Summer distractions like gardening and family time seem to keep me away from my fabric therapy!

Since my last blog post, I managed to complete another block in the Gathered Harvest BOM I'm doing via my local quilt shop.  This one is called "Fresh Pineapple".  I'm prepping the appliquĆ© shapes with freezer paper and starch, then using invisible thread to machine appliquĆ© the shapes in place - using a narrow zig-zag stitch.  

Since this block had LOTS of leaves, I tried a new-to-me technique:  I made leaf templates using card stock, then used a running stitch in the seam allowance and gathered the allowance around the template.  Then used starch and a hot iron to press the seam allowance to the back of the leaf shape (i.e. the same idea as the "perfect circle" technique).  It worked like a charm! 

Another finish:  a Rainbow Scrap Challenge project made from pinwheel blocks.  I saw a quilt in this style in a decorating magazine, and since I love nine-patch blocks, I was smitten. 

I searched Barbara Brackman's Encyclopedia of Pieced Quilt Patterns and the Quilt Index - finally discovering the name of the pattern as Flutter Wheel.  I drafted my own pattern and made pinwheel blocks every month in 2017 as part of the Rainbow Scrap Challenge.  The original quilt doesn't have an outside border, but since the pinwheels tend to stretch, I decided a solid fabric border would help prevent wobbly edges to the quilt.

Close up of the pattern:  nine patch of pinwheel blocks with pinwheel sashing squares and plain sashing.

Non-quilting, but cooking related
Dear Husband and I are cookbook collectors.  Not only do we enjoy preparing new recipes, we both tend to read cookbooks like novels.  We've purchased many cookbooks for ourselves, and been gifted many more for holidays and anniversaries.  Needless to say, we have quite a cookbook collection.  Some are frequently used favorites and others are more for reference.

A few weeks ago, Dear Husband decided we needed to put the collection to a more frequent use.  He issued a family challenge:  Sunday night dinners must include a recipe from one of the cookbooks in our collection.  Since our oldest Dear Son is currently living at home, that meant 3 rotating Sundays of different cookbook recipes.

Today was my first Sunday dinner as part of the challenge.  I chose a cookbook from way back "in the day".  Long before the Food Network or HGTV, those of us who were interested in food watched PBS for cooking inspiration.  I remember watching The Frugal Gourmet on PBS - I was a SAHM with small children and always interested in new ways of preparing meals.  My inspiration for tonight was a Frugal Gourmet - Jeff Smith - book titled "Our Immigrant Ancestors".  My immigrant ancestors mostly come from the British Isles, but I chose a recipe from somewhere completely different - Thai Beef Salad.  Which, I'm happy to report, was a big success, and will probably enter the rotation as a frequent summertime meal!

Sunday, March 18, 2018

Machine AppliquƩ with a Vintage Twist

I guess 2018 is turning out to be my Year of Machine AppliquƩ!

I finished the first block - Sweet Cherry - in the Gathered Harvest BOM sponsored by my LQS, Quilted Owl.  The patterns are from Fresh Picked by Blackbird Designs.  

I prepped all the appliquĆ© pieces using freezer paper and starch.  Next I laid the pieces out on the background fabric, so I could figure out the order to stitch each piece.  I worked in sections, using fabric glue to adhere the pieces to the background for sewing.  Using invisible nylon thread on top and Aurifil 50 weight thread in the bobbin, I stitched each piece with a very narrow zigzag stitch.  

I have started the prep work for block number 2 - Fresh Pineapple.  I'm only two months behind on the BOM process, but I'd be even farther behind if I were stitching each block by hand!

Since I've been experimenting with different machine appliquĆ© techniques this year, I decided it was time to experiment with a different sewing machine as well.  I've had this vintage Singer sewing machine for years, but it was neglected in favor of other vintage machines.  Unlike all the other vintage sewing machines in my flock, this machine can do zigzag stitching (and more).

The machine is a Singer 503A - which was a new design, introduced in 1961.  The 503A and its cousin the 500A, are also known as the Rocketeer - at least among sewing machine enthusiasts.  It's definitely got that mid-century space age vibe going!  The two Rocketeer machines were the last of the all-metal gear Singer machines.

The 503A sews several different stitches in addition to straight stitch and zigzag.  By changing the cams included with the machine, sewists can create a variety of decorative stitches.  The cams (Singer called them Fashion Discs) drop into the round opening to the right of the thread holders.  

The needle placement can be changed using the triangular knob.  The stitch width adjustment, to the left of the needle placement knob, allows for different widths on the zigzag and other decorative stitches.  The stitch length lever allows for forward and reverse stitching.  There's also a light under the Singer logo.

Probably the best reason to use this machine for appliquĆ© is the slant needle feature.  Singer slant needle machines have a needle bar that is slanted forward, which allows for much easier visualization of the stitching area.  The only thing that would make the appliquĆ© stitching a little easier here would be an open-toe presser foot - which can be purchased online for a few dollars.

So - how did the Rocketeer handle appliquĆ© with invisible thread?  Like a champ!  I used Aurifil 50 weight thread in the bobbin and a polyester invisible thread on top.  I needed to loosen the upper thread tension a good bit, but the machine handled the poly thread just fine.  Going forward, I'll use a finer gauge needle (the machine uses standard 15x1 sewing machine needles) and I'm going to order an open toe foot attachment.  I'm going to keep the Rocketeer at our camp, so I can still do machine appliquĆ© when we're there for the weekend.

I stitched up two more appliquĆ© baskets yesterday to work out the process.  

This may become a project after all!


Sunday, March 4, 2018

Machine AppliquƩ: Trying New Techniques

Back in January, I wrote about trying different machine appliquĆ© techniques this year.  My plan was to use machine appliquĆ© to complete a BOM being offered by my LQS, Quilted Owl.  Since that blog entry, I have been playing with different methods of preparing templates and the fabric appliquĆ© shapes.

I started my experimentation by following a tutorial by Julie Baird, from her website Generations Quilt Patterns.  Her method involves using water soluble stabilizer to create templates for the appliquĆ© shapes.  Julie's instructions are great and I can't do them justice in just a sentence or two, so if you're interested, go check out her technique.  
I had the pattern Julie used for her tutorial - Trick or Treat Baskets from When the Cold Wind Blows, and I went ahead and used that pattern for some practice pieces.  I didn't have any of the water soluble stabilizers recommended in the tutorial, so I tried what I had on hand.  The Pellon stabilizer worked fine for the template preparation technique, but after washing, the appliquĆ© shapes remained very stiff and inflexible.  I'll try this technique again after I've got one of Julie's recommended stabilizers on hand.

Next, I used my "tried and true" method of appliquĆ© prep: freezer paper templates and starch.   After prepping the baskets, I used a tiny bit of fabric glue to hold the pieces in place and commenced to sew.  

I used YLI Invisible Nylon Monofilament thread for the appliquĆ©.  I already had the thread on hand, and it performed beautifully in my sewing machine.  I set my machine for zigzag stitching and adjusted the stitch length to 1 and the stitch width to 1.  It's a very narrow stitch and it mimics hand appliquĆ© very closely.  I used Aurifil 50 weight thread in the bobbin.  I didn't need to adjust my tension, but your mileage may vary.  I tried taking a close-up of the actual stitching, but my camera is lousy for that. 

I heard about another prep method - this one used by quilt designer Kim Diehl.  In her book, Simple AppliquĆ©, she describes several techniques, but the one I tried involved using freezer paper in a different manner.  The freezer paper is glued to the wrong side of the fabric for the appliquĆ© shape, then the sticky side of the freezer paper is used to adhere the seam allowance AND adhere the appliquĆ© shape to the background fabric.  

The appliquĆ© shape is then machine-stitched to the background, using the same narrow zig-zag stitch and invisible thread.  When the stitching is complete, the background fabric is cut open or cut away, and the freezer paper removed (the above picture shows the back of the appliquĆ© after removing the freezer paper).

I didn't dislike this technique, but I found it difficult to remove the freezer paper.  Even though the appliquĆ© stitch was narrow, it still caught the edges of the paper, and it took careful manipulation to remove the paper.  I can see where it might come in handy for large or simple shapes, but it was akward for the baskets.

Now that I've started making the appliquĆ© basket blocks, I can't seem to stop!  I have no plans to make the original quilt from When the Cold Wind Blows - it requires almost 300 blocks - but I will probably keep making these just for fun!

And...with that said, I've finally finished all the freezer paper and starch prep for my first Gathered Harvest block.  I need to make a few more bits of bias tape for the stems, but otherwise, everything is ready to be glued in place and machine appliquĆ©d.  It will be an interesting week for Fabric Therapy!


Sunday, January 21, 2018

2018: The Year of Machine Applique?

One of my life-long quilting goals has been to become accomplished at the art of appliquĆ©.  In my early years as a quilter, I did plenty of fused appliquĆ© outlined with machine satin stitch, but the fusibles of 20+ years ago made for stiff and not very snuggly quilts.  I also learned the basics of hand appliquĆ©, but never practiced much.  

Over the past 2 or 3 years, I've challenged myself to learn hand appliquĆ© all over again.  I'm starting to feel somewhat competent at it, but there's still lots of room for improvement.  Besides perfecting the appliquĆ© stitch, there are different techniques to learn for appliquĆ© shape preparation, not to mention learning new ways to coordinate color and fabric styles.

Then there's the time requirement for all that hand-stitching.  I do enjoy the stitching process, but setting aside time for it is always a struggle.  With that in mind, I wondered if machine appliquĆ© would be a way to create traditional-look appliquĆ© in a more timely fashion.

Along came a BOM (Gathered Harvest) at my local quilt store, the Quilted Owl.  I knew a quilt from Blackbird Designs would be a good project to attempt machine appliquĆ© due to the relatively simple appliquĆ© shapes.  

The first block kit became available earlier this month.  I'm using freezer paper and starch to create my appliquĆ© shapes.  So far, I'm just prepping the pieces - there are LOTS of leaves and berries still to prep!  For stitching, I'll be using invisible thread and a very small zig-zag stitch.  I've done a few practice pieces, and the look of the stitching is very much like hand appliquĆ©!

At the same time, I'll be working on a quilt that's been in the UFO pile for far too long!
I started assembling these 3-D or Origami Bow-Tie blocks back in 2012, but they got set aside for some reason or other.  The blocks are from an exchange that happened in 2005, so they've waited long enough!

Fast-forward to yesterday, when I finally started to attach the appliquĆ© shapes to the border!  I had prepped all the shapes in 2012, so now I just need to get everything in place and stitched.  The border is from the cover of Quick Quilts from the Heart by Liz Porter and Marianne Fons.

The shapes have been applied using SoftFuse, which is softer and more flexible than the fusibles from days gone by.  Instead of using the invisible thread technique, these shapes will be stitched using Aurifil 50 weight thread and a machine blanket stitch.  It will take some time to stitch everything, but it's still faster than hand appliquĆ©!